Pages

Contact

Contact : vozk2014@gmail.com
http://linkcash.fr/fpug620
http://linkcash.fr/pmbk481

Saturday, January 18, 2014

How To: Enable Or Disable Auto Screen Rotation On Android

Auto screen rotation is a convenient feature for some, while some hate it. Usually this option is loved by many people, but during certain times for example when you’re laying in bed, you have to constantly rotate your entire phone. It feels like you’re with war with your device. What an inconvenience during such times!
Average users would normally take a detailed look at each and every option on their Android smartphone or tablet, at times many people wonder if they’re able turn off screen rotation on their Android. Well, the good news is that turning off/on screen rotation is a matter of seconds and you don’t need to be an Android expert to do this.
While many people leave this option enabled by default, and never bother to disable it, it just doesn’t make sense. If there’s an option, then you should enable or disable it as per your convenience.

How to turn off/on screen rotation on Android

The exact method may vary by devices, for example, Samsung’s TouchWiz UI has the option to enable or disable screen auto-rotation from the pull down menu. For other phones, simply follow the below method, which can be said as a universal method that will work with mostly all Android devices.
auto-rotate
Head to Settings and tap on Display. Here, you’ll find an option for Auto-rotate screen, and that’s what we’re looking for. Uncheck it to disable auto-screen rotation, or check it to enable auto-screen rotation. Well, that wasn’t hard was it?
Once disabled, no matter which app you use, your screen won’t auto-rotate. Alternatively, there are some widget apps that you can install from the Play Store which will add widgets which will enable and disable screen rotation.

»»  read more

How to tell if your Android phone is infected with malware

l don't think it's far-fetched to say that most people have no idea if their mobile devices have been infected with malware, simply because they don't think mobile malware even exists (call it the Mac syndrome?).

How to tell if your Android phone is infected with malware

On a PC the signs are pretty obvious. Your computer slows to a near-screeching halt, your browser re-directs you to random websites, your friends are suddenly calling asking about your career change to become a Viagra distributor (since your email has probably been hacked). Your IT guy can often tell by looking at your process names, as malware authors might name their malicious process 'svchsot.exe' to look like a legit one 'svhost.exe' (see what I did there?).
Harder to tell on a phone

According to Kaspersky malware researcher Tim Armstrong, users usually don't discover something's wrong until they look at their phone bills and don't recognise the numbers of text message recipients.

Premium rate SMS Trojans are the most common type of mobile malware. This malware disguises itself in a legit-looking app, and secretly sends SMS short codes that bill the caller.

Nor will an average user really be able to tell by checking app permissions. Android developers can choose from dozens of permissions, and as Armstrong notes, it's often impossible to guess which are legitimate and which are warning signs.

Another sign, according to Lookout Mobile, is sudden, decreased battery life.

Beyond malware, however, your mobile device might be subject to an even greater threat: an aggressive ad network. Google Play doesn't weed out apps with such networks (they own one of the most ubiquitous ones, AdMob), but many vendors now have ad network detectors. Check out Lookout Ad Network Detector or TrustGo Ad Detector.


No excuse for no antivirus

The only way to confirm your suspicions is to install an antivirus app. There are lots of free, fast, non-intrusive mobile antivirus solutions out there. Lookout for Android is our Editors' Choice for Android security, but other high-performing malware detectors include F-Secure Mobile Security 7.6 and McAfee Mobile Security 2.0. All have free versions that include a quick malware scan.

Theoretically these tips apply to the iPhone as well, but at the moment the closed nature of the Apple App Store means there are few examples of known malware plaguing iOS. Most iOS malware is distributed as fake rooting software.


Source http://goo.gl/PaBrnZ
»»  read more

How to block ads on your Android (and save data!)

Ads and pop-up windows on your computer are one of the most annoying things in the world, and that's why practically everyone has a pop-up and ad blocker installed on their desktop. But for some strange reason not everyone bothers to do the same thing for their Android - and then suffers from various sites that pop up more windows and tabs than you can poke a honey-covered stick at (for catching the pop-ups with, you see). Suffer no more! We'll show you the best way to block ads, including pop-ups, on your Android and save some of your precious data at the same time.
VideoAdsScreenshot
You can disable ads, video ads, sound ads and pop-ups (as well as all ads!). / © Facebook
Did you know that all those ads (static and video) actually use up tons of your data allowance? Just think about it. If you load a web page and there's a bunch of video ads playing on the side the entire time you're on the site, that data flow has to come from somewhere, and that somewhere is your data plan. So installing an ad blocker on your Android can not only save your sanity but also your hip pocket.
AndroidPIT Chrome Settings
Make sure your browser has popups blocked, and turn Reduce Data Usage ''On''.  / © AndroidPIT/Google
For starters, you can use a browser like Chrome that automatically blocks a lot of pop-ups. That's going to be a major boost to your sanity levels. You can also go into your Chrome Settings > Bandwidth Management > Reduce Data Usage to save even more of your precious bits.
AndroidPIT Adblock Plus Install
Hit the APK link on your Android and install Adblock Plus. / © AndroidPIT/Adblock Plus
I'm rooted, so I used Adblock Plus. Simply hit the link on your Android, download the Adblock Plus APK (you'll need to enable Unknown Sources in your Security Settings first) and launch it. If you're rooted, Adblock Plus will ask you for Superuser permission. Grant it and you're done. You can then choose a subscription – EasyList is fine – and decide if you want all ads blocked or just ''inappropriate'' ones. It's up to you if you can handle some advertising or want everything blocked. Inappropriate ads include video ads and those with sounds etc.
AndroidPIT Adblock Plus Settings
Pick your subscription, uncheck Acceptable Ads and ditch that icon. / © AndroidPIT/Adblock Plus
To hide the icon in your notification drawer you can tick the box but this will only make the notification icon invisible. If you want it out of your notification bar entirely you'll need to go to your device's Settings > Apps > Adblock Plus and uncheck the Show Notifications box.
AndroidPIT Adblock Plus Proxy
You'll simply have to configure your own proxy settings if you're not rooted. / © AndroidPIT/Adblock Plus
If you're not rooted, don't despair. You simply need to do a little more leg work with your proxy settings. Just go to your Settings and select Wi-Fi, long press the connection you're on (you'll obviously need to do this for all of the Wi-Fi networks you regularly log into) and select Modify Network. From here, go down to Show Advanced Options and switch the Proxy Settings to Manual (it'll be set automatically to None). This will bring up further options: you simply need to change the entry in the Proxy Hostname field to localhost and the Proxy Port to whatever number Adblock Plus has told you to change it to. For me it was 2020. You don't need to add any exceptions.
AndroidPIT Adblock Plus Before After
Et voila! Before and after - ads versus clean white space. / © AndroidPIT
Now, you can set your notification options as above and start launching ad-heavy websites as much as you like. Instead of seeing all the banner and sidebar ads you'll just get white space – it may seem a little weird at first but that nice ''breathing space'' is actually kind of nice once you get used to it. Not to mention the fact that you won't be seeing all sorts of flashy, noisy and moving image ads all of the time. Some sites, like Forbes, will still show their initial pop-up advertisement, but there will be nothing in it. Some of these are unavoidable. Combined with Chrome's pop-up blocker (plenty of other browsers have similar functions), Adblock Plus will save your sanity, your data and your impulse to consume.
Do you use an ad blocker or pop-up blocker on your Android? What combination do you use?
»»  read more

How to use AirDrop for iOS: The ultimate guide

How to use AirDrop for iOS: The ultimate guide

AirDrop began as an OS X Lion feature that let Mac users easily beam files to each other over an ad-hoc Wi-Fi connection. After several attempts to bring it to iOS were rejected for not being accessible enough to mainstream customers, a new version was d

AirDrop began as an OS X Lion feature that let Mac users easily beam files to each other over an ad-hoc Wi-Fi connection. After several attempts to bring it to iOS were rejected for not being accessible enough to mainstream customers, a new version was developed specifically iOS 7 that's simpler and more obvious. Unfortunately, despite sharing the same name, the iOS version uses a different protocol from the Mac version, and that means — for now — it can only be used to send data between iPhone, iPod touch, and iPad. If that's all you want to do, whether you're in the same office, school, home, park, plane, or anywhere within Bluetooth and Wi-Fi range, AirDrop is reasonably quick and incredibly convenient.

»»  read more

Friday, January 17, 2014

How To Install Android 4.4.2 KitKat Official Build (XXUENA6) On Samsung Galaxy Note 3

galaxy-note-3
Ready for some Android 4.4.2 KitKat goodness on your Galaxy Note 3 (SM-N9005). We know you are, so we’ll just cut to the chase. The following guide will walk you through manually installing the N9005XXUENA6 official firmware build on your Samsung Galaxy Note 3.
As always, DroidReport assumes no liability for the firmware installation. Proceed with caution.
Before Getting Started
Before you get started, make sure that your Galaxy Note 3 is the SM-N9005 model.
As always, you want to backup your device since the firmware installation will likely wipe out all your data. Additionally, the installation will remove any custom ROM installed to your device.
Charge your Note 3 to at least 80 percent before proceeding.
Ensure that you have up-to-date USB drivers installed and connect your Galaxy Note 3 to your computer. Finally, enable USB Debugging mode by navigating to Settings -> Developer Options.
Updating Galaxy Note 3 to Official Android 4.4.2 KitKat (XXUENA6)
1) Download and extract the official Android 4.4.2 firmware, which can be found here.
2) Download and extract Odin, which is available here.
3) Launch Odin as an administrator.
4) Boot your Galaxy Note 3 into Download mode by pressing the Volume Down and Power buttons together until a warning prompt appears. Once you see the prompt, press Volume Up to enter download mode.
5) Right click on Odin and launch the application as an administrator.
6) Using Odin, install the following files from the .zip archive downloaded earlier:
    A) Click PDA and select the .tar.md5 file.
    B) Select Phone and navigate to the file with Modem in the file path.
    C) Click CSC and select the file with CSC in the file path.
    D) Click PIT and select the file with .pit in the file path.
7) Navigate to the Option submenu in Odin and check Auto Reboot and F.Reset Time. Uncheck Re-Partition.
8) Click Start and the installation will begin.
9) When the firmware has finished flashing to your Galaxy Note 3, your phone will automatically reboot.
10) Once your Galaxy Note 3 restarts, you will officially be running Android 4.4.2 KitKat XXUENA6. Kudos.

Source http://goo.gl/4an8os
»»  read more

How to run Android apps on a Windows PC, the right way

A few years ago, I discovered an interesting company called BlueStacks that has an Android app player for Windows. And when I say I discovered it, I mean it moved into the office next to mine. Discovering the company was pretty easy.

Trending: Supercomputer takes 40 mins to calculate a single second of human brain activity

I had actually heard about BlueStacks from some of my OEM clients who were quite excited about what the company had shown them. So I met with the company and also became quite interested in its technology.

With BlueStacks' software, people can take apps from their Android devices and send them via a piece of software downloaded on to their device called Cloud Connect directly to the BlueStacks player on a Windows PC.

When a user goes through this simple procedure, Android apps just show up in the BlueStacks Player on Windows. Like magic, they run on Windows as is, in full screen, with no performance degradation. That means software written for Android, such as Pulse and Flipboard, can now run on your Windows PC and be tied to the data layer of your Android version, too.
Run Android apps on your PC

Although BlueStacks has a "Get More Apps" section built into the player itself, most of the ones there now are just to demonstrate what can be done. In actuality, people will just download Android apps from the Android Marketplace or Amazon's Appstore for Android and then use Cloud Connect to transfer them to a Windows PC.

The program has a lot of new features and enhancements planned that would give the program even more functionality. To be honest, though, just having my Android apps on my PC is already a good reason to try it out. Not to mention, it's free.

Think about your use of your apps on your smartphone or tablet today. How many times have you thought, "I wish I had that same app on my PC?" The reason you may be saying that is because so many of the apps written for a smartphone or tablet are compact, concise, and deliver just the function you need at the time you need it.


For example, when travelling, I often use a currency converter. To get that same function on a PC, I have to go to a website and find that converter. Even if I bookmark it, it takes at least two or three more clicks to get the information I really want. On the other hand, on my Droid or iPhone, I just tap the currency converter app and I am ready to go.


Read more: http://goo.gl/NjxMgE
»»  read more

How to join the CyanogenMod GalleryNext beta

CyanogenMod has released its photo gallery app in public beta for all to test. Here's how you can begin using it right now.
(Credit: Jason Cipriani/CNET)
CyanogenMod, the open-source version of Android that is growing in popularity, has released what is expected to eventually be the officially gallery app for the custom OS.

»»  read more

How to Add Words to the Dictionary on Android

Typing on our smartphones and tablets has improved immensely over the past few years. Google’s own keyboard is getting smarter and smarter, and third party alternatives like SwiftKey and Swype are excellent. However, there is a dictionary on Android it tries to follow, and as a result some words or names always get corrected, even when you don’t want them to.
If you’re like me you have a few friends with crazy weird first or last names, not to mention we’ve all seen those autocorrect fails that are all over the internet. Thankfully on Android we can quickly and easily add words, names, and of course the occasional curse word to our phones dictionary, so it no longer tries to correct a word you actually want to use. Below we’ll show you how easy it is to add a few words.
Screen Shot 2014-01-17 at 11.35.26 AM
We’re running Android 4.4 KitKat here, but almost all 3rd party keyboards have a similar solution, not to mention Google’s own keyboard has an “Add to dictionary” button to make this extremely simply. So next time you try to text your friend with an unusual name, the auto-complete field will correctly display that name, rather than switch it to something totally wrong.

INSTRUCTIONS:

Not all phones will have the exact same selection, not to mention 3rd party keyboards make this different for some. However, most Samsung Galaxy devices, or anything running Android 4.3 or 4.4 KitKat should have an add to dictionary option that’s rather easy to find.
You’ll tap settings (gear-shaped icon) and head into the phone settings, then you’ll want to scroll down to Language & Input or Language & Keyboard, and then tap Personal dictionary, or User dictionary, depending on the phone.
Screenshot_2014-01-17-10-42-18
From here you’ll simply hit the + icon at the top right for stock Android, or hit the plus or add button for most other phones, and you’ll instantly be able to add a word, name, or swear word to your user dictionary. Now, the next time you type it your phone will remember, and you’ll keep your texting flow moving right along.
Screenshot_2014-01-17-10-43-07
Above you’ll also notice the right side screenshot says “shortcut” for an optional shortcut. This is great for websites or email addresses. If I add GottaBeMobile.com to my dictionary and set the shortcut as GM, typing GM will instantly have the dictionary suggest the website, and I’ve just typed two letters instead of the entire address. It’s a wonderful little hidden trick.
Alternatively, with the official Google Keyboard you can simply tap the word while typing it, if it isn’t the middle suggestion with next word prediction it will be to the left or right, tap it and Google will automatically give you a choice to tap again to save. This does the same thing as the steps above, all from the keyboard while typing, and makes it quick and even easier. See the screenshot below for an idea of what to lookout for.
Screen Shot 2014-01-17 at 11.16.52 AM
Many 3rd party keyboards available today will simply let you long press a word while typing it, and instantly save it to your user dictionary as well, if the steps above differ from what you’re seeing on your own device. In general the steps or location should be the same, or extremely similar.
If these settings aren’t in the same place on a third party keyboard try going to settings > language and input > and head to the settings for that particular keyboard and you’ll likely find the option to add a word to the dictionary.
That’s it, it’s that easy to add a word and keep typing with ease. Enjoy!

»»  read more

Apple to refund £20m to parents: How to stop your kids buying apps & in-app purchases on your iPad, iPhone

Use restrictions, passcodes, new Apple IDs and iTunes Gift Cards to limit children's access to iOS devices.

by  16 Jan 14

Kids love iPads and iPhones. They're a great way to keep children entertained during the summer holidays, with hundreds of apps available for them to enjoy, including games, books, educational apps. However, in light of a recent bout of incidences that saw parents faced with huge iTunes bills after their kids had unwittingly downloaded apps and in-app purchases, it's worth taking precautions to ensure that your children aren't able to do the same while using your iOS device.
Most recently, it was revealed that Apple has agreed to refund at least $32.5 million (£20m) to parents whose kids racked up huge bills through in-app purchases in the US. The agreement is to settle a Federal Trade Commission complaint. As part of the settlement, Apple will also be required to change its billing practices by 31 March 2014 to help prevent these occurances from happening in the future.
According to FTC, Apple has recieved tens of thousands of complaints about unauthorised in-app purchases downloaded by kids.
The easiest way to make sure that your kids don't end up downloading any apps or in-app purchases on your iOS device is to ensure that they never get hold of your password. 
Each time they want to download or purchase something, it will ask for your Apple ID password. Enter your password yourself every time.

How to turn on restrictions on iPhone, iPad

However, you should be aware that, when you enter your password, the default is that it will not need to be entered again for 15 minutes. Within that time, your children could accidentally download hundreds of pounds worth of in-app purchases.
For example, in 2013, five-year-old Danny Kitchen was playing Zombies vs Ninja when he asked his dad for the password to the family iTunes account so that he could download the free-to-play app. However, Danny then went on to download a £69.99 in-app purchase 19 times within the next ten minutes as the password did not need to be entered again.
To change this setting and prevent this from happening, go to Settings > General > Restrictions, and then change the 'Require Password' setting to 'Immediately'. Now, every time your child goes to buy something, whether it is an app or in-app purchase, they'll be asked to type in the password before they can progress further.
To stop your kids from having access to the Restrictions menu and changing the settings back (if your kids are a little older and more tech-savvy), you'll be asked to set up a PIN code.

How to restrict acces to apps on iPhone, iPad

You can ensure that your child doesn't download any apps at all by going to the Restrictions menu and changing the 'Installing Apps' slider to off (from green to white). Within this menu, you can also turn off Safari, Camera, FaceTime, iTunes, iBookstore, Deleting Apps, Siri and Explicit Language for further control over your child's access to your iPad or iPhone's features.

How to turn off in-app purchases on iPhone, iPad

You can also turn in-app purchases off completely from this menu if you want to. You'll find the on/off slider towards the bottom of the restriction options.
Within the Restrictions menu, you can also prevent kids from downloading content from the iTunes Store that may be inappropriate, by tapping each different type of content (music, movies etc.) and choosing your preferred age rating.

How to turn on device passcodes on iPhone, iPad

It's not just within apps or on the iTunes App Store that kids can end up spending their parents' money without realising. In July, a 14-month-old girl accidentally purchased a car using the eBay app when she was playing with her dad's iPhone. In this case, to prevent a child from being able to access your iPhone or iPad at all, you'll want to set up a device passcodes.
To set up a passcode, go to Settings > General > Passcode Lock and tap 'Turn Passcode On.'
You can then choose your passcode. If you slide the 'Simple Passcode' slider to off, you'll be able to type a word rather than the default four-digit number to use as your passcode.

Create a new Apple ID

Having read all this advice, you might be thinking: "What about when I want to use my iPad?"
Apple recommends that, for children over 13, you should create an individual Apple ID for them to use. While this removes the nuisance of having to turn restrictions on and off every time you want to use it, you will need to switch from your Apple ID to your child's and vice versa. However, the benefit is that you can ensure that your child's Apple ID has no credit card on file, meaning there's no money for them to spend in the first place.
In order to switch between Apple IDs, you'll need to go to Settings > iTunes & App Stores and then tap on Apple ID to log out.

Give kids iTunes Gift Cards or iTunes Monthly Gift allowances

If you want to give your child a limited amount of money to spend on their own Apple ID, you can buy an iTunes Gift Card or Certificate from the iTunes Store for them to use.
Further still, you can set up an iTunes Monthly Gift to give your child a set amount of money to spend in the iTunes Store each month. The iTunes Monthly Gift can range from £5.00 to £30.00 in value, and can be cancelled at any time.
Of course, the other option is to keep your iPad or iPhone out of their reach completely.
There have been some extreme cases in the UK that saw parents refunded by Apple after their kids downloaded expensive apps and in-app purchases, too. Last year, a parent was refunded£4,000 after his eight-year-old daughter spent the money playing Campus Life, My Horse, Hay Day and Smurfs' Village on an iPad.
There's no guarantee that you'll be so lucky, though, so the best bet is to try and prevent it from happening in the first place, by following this advice.

»»  read more

How to jailbreak any iPhone or iPad in iOS 7 and iOS 6: Tips for jailbreaking Apple devices

Want to jailbreak your iPhone or iPad and install unauthorised apps? It's risky, but if you're sure, here's how to jailbreak an iPhone in iOS 7 or iOS 6.

by  17 Jan 14
How to jailbreak an iOS 7 iPhone
Jailbreaking your iPhone or iPad is a risky process that we can't wholeheartedly recommend, but it remains popular among those who wish to install unofficial apps (such as those on the Cydia marketplace) on their smartphone or tablet. Here's how to jailbreak your iPhone or iPad in iOS 7 - and iOS 6 and earlier. Updated 17 January 2014, to add the new iOS 7 jailbreak tool.
(What is jailbreaking? In essence it means bypassing the locks put in place by Apple on its iPhones and iPads, and thus gaining access to a large number of apps that Apple hasn't authorised. For explanations of more Apple-related terms, see our Apple jargon-buster encyclopedia.)

How to jailbreak an iPhone: A warning

But first... Some of the unofficial apps that you'll get access to after jailbreaking are pretty tempting, and may offer features you'd never otherwise be able to access; blocking a phone number on an iPhone, for instance, wasn't possible officially until iOS 7 launched, but an app on Cydia (where you can download apps for jailbroken iPhones and iPads) let you do it easily.
Cydia on iPhone
How to jailbreak an iPhone: Cydia is the app that lets you browse and download further unofficial apps
So why doesn't everyone jailbreak? Well, for one thing it's by no means straightforward, as we'll see shortly. Jailbreaking is also legally ambiguous, risky, and prone to void any warranties you have with Apple. We advise you to think long and hard before going ahead with the jailbreaking process.
Apple itself offers advice on the subject of jailbreaking (although you may feel that the company is biased in this respect, since it wants to continue getting its cut of the revenue from official app sales). In this tech note Apple suggests that jailbreaking your iOS device may lead to security vulnerabilities, instability, shortened battery life, unreliability, disruption of services and inability to apply future software updates. It may result in Apple denying service for your device.
Nonetheless, many Apple fans have been jailbreaking iOS devices for years without encountering these issues. But once they've jailbroken such a device, they understand that they should expect no help from Apple if it causes them trouble in the future. With choice comes responsibility.

How to jailbreak iOS 7 (and iOS 6 and earlier)

We had to wait for a bit, but the jailbreak tool for iOS 7 has been launched by the Evasi0nteam. (The Evasio0n team offer one word of warning, however: "Over The Air updates of iOS 7 are known to create an issue and make the jailbreak fail. Some devices are then stuck on the Apple Boot Logo. Until we fix that, please restore your device to 7.0.4. with iTunes first.")
Before you start, back up your iPhone or iPad, and switch off the passcode (at least for the duration of the jailbreak process).
Before jailbreaking, be sure to back up your data
You’ll need to download the Evasi0n7 tool, which is available for Mac OS X and Windows, and is compatible, the makers claim, with all models of iPhone and iPad running iOS 7.0 to iOS 7.0.4. The tool is available from mirrors on evasi0n.com. Double-click the .dmg file to decompress it and an evasi0n window will appear on your desktop. Drag the evasi0n application out of the window to the desktop and launch it.
Connect your iOS device and click the Jailbreak button. evasi0n will retrieve some information from your device. The device will then reboot and prepare itself for the jailbreak. Don't do anything with your device during this stage.
evasi0n begins its work
evasi0n will now install Cydia - the application that provides access to third-party apps - on your device. When instructed to by evasi0n, unlock your device by pressing the Home button and swiping the Slide to Unlock switch to the right. You should see a new Jailbreak icon on your Home screen. Tap it and evasi0n will carry on with the final stage of the jailbreak. You can now quit evasi0n by clicking the Exit button.
Don't touch your device until evasi0n tells you to
Your device will reboot, briefly display the evasi0n screen, show the Apple logo, and then show the evasi0n screen again, which details the progress of the jailbreak installation. Finally, your device is ready for you to use in the normal way.
The one difference you'll see is a Cydia icon on the home screen. Tap it and Cydia launches, prepares its file system, and then quits. To then use Cydia as intended, tap its icon once again, choose your user type (User, Hacker, or Developer), tap Done, and the Cydia interface loads.
The version of Cydia you're using may need updating; older versions of Cydia may not support Cydia's newer third-party apps. To do that, tap the Changes icon at the bottom of the screen and then tap Refresh in the top left corner. If any updates are available (as evidenced by green check marks) tap the Update button in the top-right corner of the display. Cydia will download the latest updates and reboot the device.
What you choose to install is entirely up to you. Some people choose to install OpenSSH so that they can remotely access the device's file system via a standard FTP client. However, if you enable this feature, be sure to change your device's root password from the default "alpine," which is used by all iOS devices. Fail to do so and others around you could hack into your device. To learn how to change the password, tap the Root Password How-To link on Cydia's About screen.
Cydia is now in the house

How to jailbreak an iPhone: Future updates of jailbreaking tools

There was a decent wait between Apple releasing iOS 7 and a jailbreaking tool being released for the system - most likely because iOS 7 represented a more substantial update than most new versions iOS. As Apple releases minor and major updates to iOS, new jailbreaking tools (and updates to tools) will be released too, but there may again be a wait.
If you want to keep track of when jailbreak tools are launched in the future, two useful options are following @evad3rs on Twitter (that's the account used by evasi0n), and checking out the jailbreaking section on Reddit.
In the mean time, look out for scammers. Lots of unscrupulous companies and individuals claimed to have cracked iOS 7 before a reliable tool was released by the Evasi0n team, and offered to give you the jailbreak for a sum of money - often $50.

How to jailbreak an iPhone: tethered and untethered jailbreaking

Finally, some words on jailbreaking terminology.
Jailbreaking has been in a largely dormant state since the release of iOS 6. In that version of the mobile operating system, Apple closed many of the avenues that had once been used to crack iOS open.
Tethered jailbreaks require you to attach your iOS device to your computer and run an application to jailbreak it. If you later power off the device and then restart it, the jailbreak is wiped out, and you have to repeat the entire process.
These kinds of jailbreak were the first to be developed. But what prospective jailbreakers wanted was an untethered method, where the hack would remain in effect even after the device was switched off and on again.
That untethered jailbreak arrived in the form of evasi0n. Like jailbreaks before it, evasi0n doesn'tunlock an iPhone (which would allow you to use the device with multiple carriers). Rather, it simply allows you to install third-party apps not approved by Apple via the Cydia store we mentioned earlier.

»»  read more

iOS 7 Basics – How To Use Spotlight To Search Your iPhone [iOS Tips]

spotlight
You can hit Command-F to find anything on your Mac, or you can hit Command-Space to invoke Spotlight, which took over for Sherlock as the built-in searching system many moons ago. In Windows 8, you can use the Search “charm.”
On the iPhone and iPad, however, some might be a little confused. There’s no keyboard commands in iOS, and Apple has even moved the Search functionality in iOS 7 from the furthermost left icon page.
What’s an iPhone owner to do when she wants to search for that specific app that she’s buried in a folder somewhere on her device, or needs the phone number of her best friend, because she’s always just used Siri to call her and has no idea what her number actually is?
While this tip may seem a bit basic, I still see the question in various iPhone user forums and such: How do I find Search on my iPhone or iPad?
In iOS 7, Apple moved the Spotlight function, but not to confuse anyone. The reason they moved it is ostensibly to offer Spotlight searching from any of the Home pages. Perviously, you’d have to swipe all the way to the left to find Spotlight, on it’s own separate page.
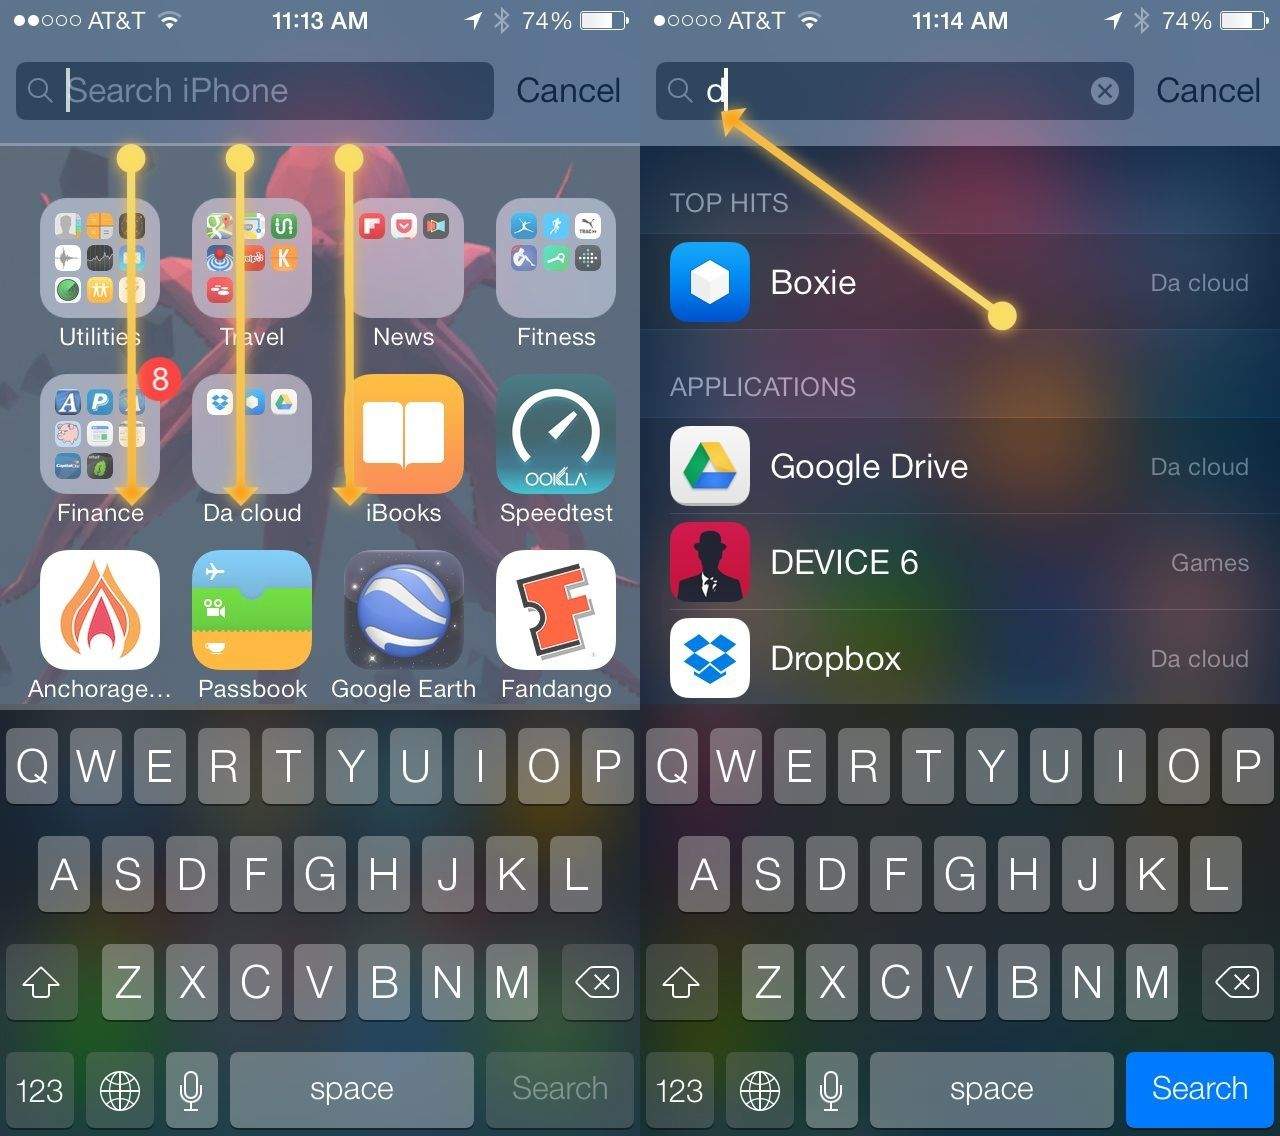
Now, all you need to do is to swipe downward from any page on your iOS device (but not when you’re in a folder), and the Spotlight search field will drop down from the top.
Apple even brings up the keyboard and sets the cursor into the search field, making it a cinch to start typing the first few letters of whatever you’re searching for. If you want to filter your results to only Applications and Contacts, for example, you can also customize what Spotlight looks for, and in what order.

»»  read more